PEEK Milling for Dental Frameworks: Parameters, Tools, and Tips

PEEK — polyether ether ketone — has been around in medical implants for decades, but dental labs are only now starting to mill it regularly. There's a good reason: it's metal-free, biocompatible, lightweight, and patients actually like how it feels in their mouth. But if you try milling PEEK the same way you mill zirconia or CoCr, you'll end up with a melted mess. Here's what you need to know to get clean, accurate PEEK frameworks off your machine.
Why PEEK Behaves Differently Than Anything Else in Your Mill
PEEK is a semi-crystalline thermoplastic. That single fact changes everything about how you approach it. Zirconia is ceramic — it chips. CoCr is metal — it cuts. PEEK is plastic — it melts and deforms if you generate too much heat.
The material properties tell the story:
- Flexural strength: ~170 MPa (strong enough for frameworks, not as rigid as metal)
- Melting point: 343°C (sounds high, but friction at the bur tip gets there fast)
- Thermal conductivity: Very low (heat stays right where you're cutting instead of dissipating)
- Elastic modulus: ~4 GPa (much closer to bone than metal, which is actually an advantage for implant-supported work)
Compare that to CoCr at ~210 GPa elastic modulus or zirconia at ~200 GPa. PEEK flexes. That flexibility is why patients report less discomfort with PEEK frameworks, but it also means you can't clamp it too aggressively or it'll deform during milling. You need to think about milling materials differently when PEEK is on the table.
Milling Parameters That Actually Work for PEEK
I've seen labs ruin entire PEEK discs in the first five minutes because they applied their zirconia parameters. Don't do that. Here are the numbers that work:
Spindle Speed (RPM)
Keep it between 15,000 and 25,000 RPM. I know your machine can go higher. Don't. Higher RPM means more friction, more heat, and PEEK will start smearing instead of cutting cleanly. For roughing, stay at the lower end — 15,000 to 18,000. For finishing passes, you can push to 22,000-25,000 with lighter depths of cut.
Feed Rate
This is where most people get it wrong. You want a higher feed rate than you'd use for zirconia — somewhere around 1,500 to 2,500 mm/min for roughing. The logic: faster feed means each flute takes a thicker chip, which carries more heat away from the workpiece. Thin chips mean the heat stays in the PEEK, and that's when you get melting.
Depth of Cut
Radial depth: 0.5-2.0 mm for roughing. Axial depth: up to 5 mm depending on your machine's rigidity. For finishing, drop to 0.1-0.3 mm radial. The IMES iCORE 350i handles PEEK well because it has the stiffness to maintain consistent chip loads even at higher feed rates.
Dry Milling — Not Optional
This is the big one. Mill PEEK dry. No coolant. PEEK absorbs moisture — up to 0.5% by weight — and that absorption can cause dimensional changes and reduced mechanical properties in the final restoration. Some labs use compressed air for chip evacuation, and that works well. If you want a deeper comparison of when wet vs dry milling makes sense, we've covered that separately, but for PEEK the answer is straightforward: keep it dry.
Choosing the Right Burs for PEEK
Bur selection matters more with PEEK than with most materials. The wrong bur won't just wear faster — it'll actively ruin the part.
Carbide Burs: The Right Choice
Uncoated carbide burs with sharp cutting edges and polished flutes are what you want. Two-flute end mills are preferred over four-flute because the wider flute channels give chips somewhere to go. Chip evacuation is critical — if chips pack into the flutes, they melt from friction and weld themselves to the bur and the workpiece.
Look for burs with positive rake angles. A sharp, aggressive geometry cuts PEEK cleanly. Dull or negative-rake geometry pushes the material instead of shearing it, generating heat and causing deformation.
What to Avoid
Diamond-coated burs generate too much friction on PEEK. They work by abrasion rather than cutting, and that abrasion creates heat without efficient chip removal. You'll get a poor surface finish and risk deforming the part. Save your diamond burs for zirconia and glass ceramics.
Also avoid burs designed for metal milling — they tend to have geometries optimized for metals that don't translate well to thermoplastics. The chip formation behavior is completely different.
Bur Maintenance
PEEK leaves a residue on burs over time. Clean your burs between jobs with isopropyl alcohol or an ultrasonic bath. A buildup of PEEK residue effectively dulls the cutting edge, which creates more heat, which creates more residue — a cycle that ends with scrapped parts.
Common Problems and How to Fix Them
Every lab that starts milling PEEK hits the same issues. Here's how to reduce milling errors with this material.
Melting and Smearing
Symptoms: Stringy material on the bur, glossy/melted surface instead of clean matte finish, material buildup on cutting edges.
Fix: Drop your RPM by 2,000-3,000. Increase feed rate by 20%. Switch to a two-flute bur if you're using four-flute. Add compressed air for chip blowoff. If you're using coolant, stop — switch to dry milling with air blast.
Poor Surface Finish
Symptoms: Rough, fuzzy surface with burrs and fiber pullout.
Fix: Your bur is probably dull. PEEK dulls carbide burs faster than you'd expect. Replace the bur and check that your finishing passes are using 0.1-0.2 mm stepover with the higher end of the RPM range (22,000-25,000). Also check your CAM strategy — climb milling gives better surfaces than conventional milling on PEEK.
Dimensional Inaccuracy
Symptoms: Parts come out oversized, or thin sections flex during milling causing dimensional errors.
Fix: PEEK's flexibility is the culprit. Reduce cutting forces by using lighter depths of cut. Make sure your workholding isn't deforming the disc. Some labs leave extra material on thin sections and take a second finishing pass once the surrounding material has been removed, reducing deflection.
Disc Cracking
Symptoms: Cracks appearing in the disc, especially around thin connectors.
Fix: This is usually a CAM issue, not a milling parameter issue. Check your nesting — the framework connectors to the disc need to be thick enough to handle cutting forces without snapping. PEEK's flexibility means it needs wider connectors than zirconia.
Where PEEK Frameworks Make Sense
PEEK isn't the right choice for everything, and anyone telling you otherwise is selling PEEK discs. Here's where it works and where it doesn't.
Good Applications
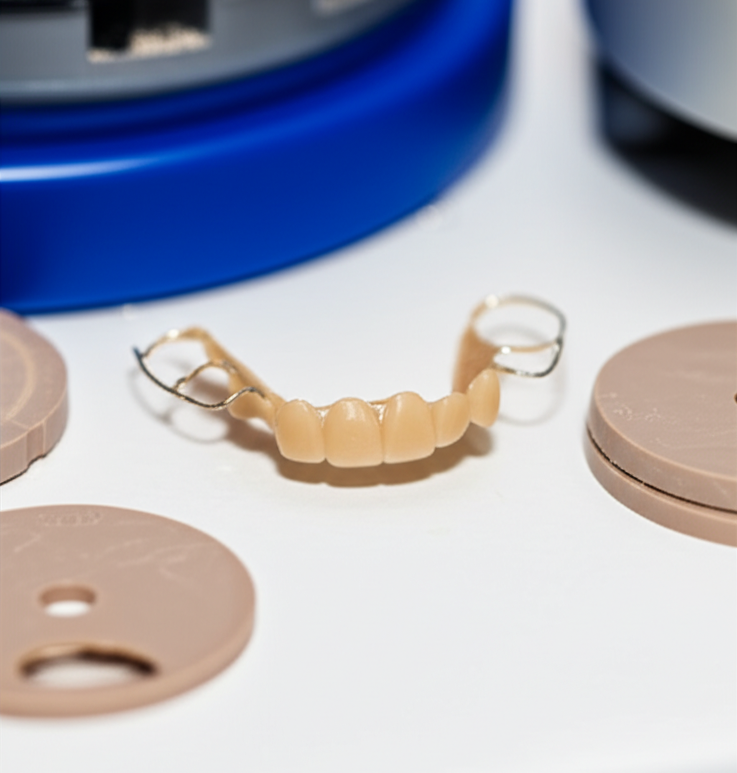
- Removable partial denture frameworks: This is PEEK's sweet spot. Lightweight, no metallic taste, clasps that flex without fatiguing as fast as metal clasps. Patients who hate the feel of CoCr RPDs often accept PEEK frames willingly.
- Implant bars and superstructures: PEEK's elastic modulus is closer to bone, which may help distribute occlusal forces more naturally than titanium bars. The evidence is still building, but early clinical data looks promising.
- Temporary abutments: For provisionalization phases, PEEK abutments are easy to mill and modify chairside if needed.
- Patients with metal allergies: Not common, but when a patient has confirmed nickel or cobalt sensitivity, PEEK provides a viable framework alternative.
Where Metal Still Wins
- Long-span fixed bridges: PEEK flexes too much for long spans. Stick with zirconia or metal.
- Kennedy Class I and II RPDs with long saddles: The flexibility that's an advantage in clasps becomes a disadvantage in long saddle areas where rigidity matters for tissue support.
- High-load posterior cases: If the patient is a heavy bruxer, PEEK doesn't have the rigidity to resist deformation over time.
Getting Started
If you haven't milled PEEK yet, start with a practice disc and a simple framework design. Set your parameters conservative — 16,000 RPM, 1,800 mm/min feed, dry with air blast, two-flute carbide bur. Mill a few test pieces and check the surface quality and dimensions before committing to a patient case.
PEEK is a material worth learning. The patient demand for metal-free solutions keeps growing, and labs that can offer PEEK frameworks alongside zirconia and CoCr have a real competitive advantage. The milling process is different enough that it takes some practice, but once you've dialed in the parameters for your specific machine, the results are consistently good.